Guest orders
The Guest Orders tab allows you to focus on guest-related issues and requests. This is the perfect option for the front desk or call center responsible for guest requests.
You can quickly check on the status of a specific order by entering the guest name or guestroom number in the Search box and pressing ENTER.
To view the guest order details click anywhere in the row.
Click  to create a new guest or service order.
Watch the video
What do you want to do?
In addition to the search and sort functions, you can use other tools, like the Column Chooser and Filter Builder, to navigate the lists and find just what you need. Use these individually or in combination. And don't forget that you can sort the column headers too.
The search, sort, filter, and column chooser are tailored for each module or tab. All features might not be available.

Click Full Screen ( ) to display the order list in full screen mode. This increases the number of orders displayed. Work in full-screen mode as you do in normal mode to create and manage orders, expand and collapse side panels, and access inline training and help.
Adding attachments to orders causes the full-screen mode to close.
Click Full Screen ( ) or press the Esc key to exit full screen
Click Collapse Navigation Pane ( ) in the left sidebar to collapse the menu. The menu icons remain visible. Hover over an icon to display its label.
Click Navigation Pane ( ) in the left sidebar to expand the menu.
The Operations and Configuration modules expand to display all columns. Use the horizontal scroll bar at the bottom to navigate.
If the current module view is customized, the horizontal scroll bar is inactive. To activate the horizontal scrolling feature:
-
Click the Column Chooser (
 ).
). -
Select Reset Columns. The horizontal scroll bar displays at the bottom of the page.
The horizontal scrolling feature is available in any Operations or Configuration modules, but it is not required.
Click Refresh ( ) to view the most current information.
In the Search box, enter a keyword, full or partial, and then click Search ( ). Some search lists have an arrow to the left of the Search box that you can use to further narrow the search.
Click any column header to sort the values in that column in ascending or descending order.
Use the column chooser to customize your view by adding or removing columns, so that you have just the information you need.
-
Click and select Column Chooser. (
 ) The Column Chooser menu displays.
 -
To remove a column, click the column header, drag it to the Column Chooser menu, and release. Continue until you have customized the view the way you want it.
-
To add a column, click the column header in the Column Chooser, drag the column where you want it, and release.
Action Time column is available only for deferred orders in the Pending Oders, Guest Orders, and All Orders.
-
Click X to close the Column Chooser menu.
When you want to reset the columns to their original state, do the following:
-
Click Column Chooser (
 ) and select Reset Columns.
 -
Click OK (
 ) to confirm.
Click Column Chooser (). A dashed rectangle displays above the list headers with instructions to 'Drag the column header to group by that column.' When you drag a column header, the grouped entries display collapsed and in ascending order.
-
Click Expand
 to expand the selected column .
 -
Click Collapse
 to collapse the selected column.
Click Download ( ) to download the list to an Excel spreadsheet.
Each list view has its own filters. Use the filters to select and customize to focus on a specific group of data, such as a specific order type, status, location, and so forth.
- Click Filter Builder (
 ) to open.
 - Click a filter.
- Select parameters.
- Repeat steps 2 and 3 as appropriate.
- Click Apply. The list is updated based on the selected filters.
-
Click Clear Filter (
 ) to remove filters.
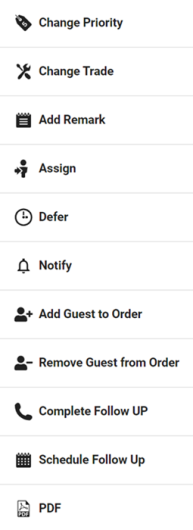
- Select the checkbox to the left of any item or items in the list.
- Use the options at the bottom of the page to bulk edit the selected items.
-
Click More Options (
 ) to see all your options.
 -
Enter information as it applies to the selection you've made.
-
Click OK (
 ) to confirm.
The follow up option allows your team to elevate the guest experience by ensuring the guest is happy with the service they received. Based on your property's business rules, a follow-up can automatically be generated after a guest order is completed.
You can perform a follow up from the Guest Orders or All Orders list. Find the Follow Up column and look for the red or yellow icon. You can also perform a follow up from within an order, click to open, and look for the Follow Up card.
-
Click the Follow Up icon
 or
or  .
. -
Contact the guest, following property protocol.
-
If the guest is satisfied, click Follow Up Done (
 ) to close the order.
 -
If you can't reach the guest, click Reschedule Follow Up (
 ) to reschedule the call.
 -
If the guest is not satisfied, click Reopen (
 ) to reopen the guest order and resend to a team to address.
 -
Use Recovery (
 ) when you need to reassure the guest of their importance to the hotel.