Enable room block features
The following steps provide instructions on how to enable the new room block features. These features require R4 (version 1.49) or later. To determine the release installed in your org, see Installed Packages.
For assistance with any feature configuration, contact your Amadeus sales representative to learn more about our Professional Services offerings.
To enable the room block features
- Go to Setup > Create > Objects > Room Block > Search Layouts > Edit Search Results.
- In the Available Fields list, select the following fields:
- Name
- PMS ID/Group Code
- Booking
- Start Date
- End Date
- Room Block Status
- Total Roomnights Agreed
- Total Roomnights Blocked
- Owner Alias
- Property
- Click Add to move those fields to the Selected Fields list.
If two PMS ID/Group Code fields are available, select the second one.
- Click Save.
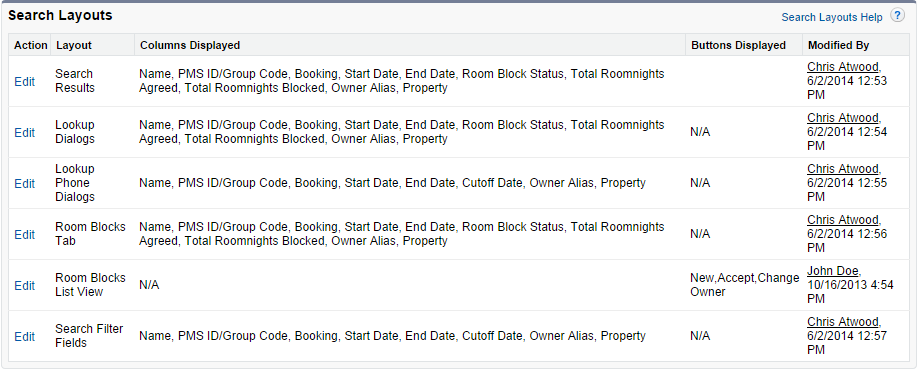
- Edit the remaining layouts to match the following image:

- Go to All Tabs (+) > Room Blocks >Edit View.
- In the Available Fields list under Step 3, select the following fields:
- Name
- PMS ID/Group code
- External ID
- Start Date
- End Date
- Total Roomnights Blocked
- Room Block Status
- Property
- Click Add to move those fields to the Selected Fields list.
- Click Save.
- Go to Setup > Create > Objects > Property > Page Layouts > Edit Property Layout.
- Navigate to the Default Configuration section of the layout and click the Properties
 icon in the upper-right corner of the section.
The Section Properties window opens.
- In the Section Name field, change the name of the section to Guestroom Configuration, and then click OK.
- In the Property Layout toolbar, click Fields.
- Drag the Enable Room Block Status field into the Guestroom Configuration section and place it above the Restrict Booking Move with Pickup field.
- Navigate to the Guestroom Types related list and click the Properties icon.
The Related List Properties - Guestroom Types window opens.
- Ensure Name, Room Type Code, Default Quantity, Sort Order, and Active are in the Selected Fields section, and sort the data in Ascending order.
- Click OK.
- In the Property Layout toolbar, drag a new Section onto the layout above the Guestroom Configuration section.
The Section Properties window opens again.
- Do the following:
- In the Section Name field, enter Booking & Event Configuration.
- Select the Detail Page and Edit Page checkboxes.
- In the Layout box, select 2-Column, and in the Tab-Key Order box, select Left-Right.
- Click OK.
- In the Property Layout toolbar, click Fields.
- Drag the following fields to the Booking & Event Configuration section you just created.
- Click Save at the top of the Property Layout page.
- Go to Setup > Create > Objects > Guestroom Type > Page Layouts > Edit Guestroom Type Layout.
- Navigate to the Guestroom Type Days related list and click the Properties
 icon.
icon.
The Related List Properties - Guestroom Type Days window opens.
- Ensure Name, Effective Date, Room Type Physical Inventory, Room Type Total Available, Total Transient Protected, and Total Transient Sold are in the Selected Fields section, and sort the data in Ascending order.
- Click OK.
- Click Save at the top of the Guestroom Type Layout page.
- Go to Setup > Create > Objects > Edit Room Block.
- Navigate to Optional Features and select the Track Field History checkbox.
- Click Save.
- On the Custom Objects page, click Room Block.
- Navigate to Custom Fields & Relationships and click Set History Tracking.
- Select the checkbox next to each of the following fields that needs to be tracked:
|
|
- Click Save.
- Go to Setup > Create > Objects > Room Blocks > Page Layouts > Edit Room Block Layout.
- In the Room Block Layout toolbar, click Related Lists.
- Drag the Room Block History related list onto the layout at the bottom of the page.
- Click Save at the top of the Room Block Layout page.
- If the Overwrite User's Related List Customizations message is shown, click Yes to confirm you want your changes to overwrite users' personal related list customizations.