Enable batch merge
The following steps provide instructions on how to enable the batch merge feature. This feature requires R5 (version 1.52) or later. To determine the release installed in your org, see Installed Packages.
For assistance with any feature configuration, contact your Amadeus sales representative to learn more about our Professional Services offerings.
To enable the batch merge feature
The following steps are only required if you are using R6 or earlier. If you have installed R7 or later, batch merge permissions are handled by the default permission sets that are included with your managed package.
- Go to Setup > Manage Users > Profiles > Event Only User > Object Settings > Batch Merge > Edit.
- In the Tab Settings picklist, select Default On and click Save.
- Go to Setup > Manage Users > Profiles > Event Only User > Object Settings > Batch Merges > Edit.
- Under Object Permissions, select the Enabled checkbox for Read, Create, Edit, and Delete.
- Click Save.
- Repeat these steps for the following profiles: Event Only Corporate Administrator, Event Only Property Administrator, Sales and Catering User, Sales and Catering Property Administrator, and Sales and Catering Corporate Administrator.
To give users access to the Create Batch Merge Document page, you'll need to enable the Visualforce page for all Amadeus custom profiles. These steps are only required if you are using R6 or earlier. If you have installed R7 or later, the Batch Merge VisualForce page is handled by the default permission sets that are included with your managed package.
- Go to Setup > Manage Users > Profiles > Sales and Catering User > Visualforce Page Access > Edit.
The Sales and Catering Profile page opens.
- In the Available Visualforce Pages list, select nihrm.BatchMerge, and then Click Add to move it to the Enabled Visualforce Pages list.
- Click Save.
- Repeat these steps for the following profiles: Sales and Catering Property Administrator, Sales and Catering Corporate Administrator, Event Only User, Event Only Corporate Administrator, Event Only Property Administrator.
- Go to Setup > Create > Objects > Booking > Page Layouts > Edit Booking Layout.
- In the Booking Layout toolbar, click Buttons.
- Drag the Batch Merge button to the Custom Buttons section of the layout.
- In the Booking Layout toolbar, click Related Lists.
- Drag the Batch Merges related list onto the layout under Booking Documents.
- Click the Properties
 icon at the top of the Batch Merges related list you just added.
The Related List Properties - Batch Merges window opens.
- Expand the Buttons section of the window.
- Clear the New checkbox. This removes the New button so users can't create a new batch merge record from the related list.
- Click OK.
- Click Save at the top of the Booking Layout page.
- If the Overwrite Users' Related List Customizations message is shown, click Yes.
- Repeat these steps for the Event Only Booking layout (if applicable).
The Default Batch Merge Start Days and Default Batch Merge End Days fields need to be added to the Property layout. You can then use these fields to specify which dates are displayed by default in the Event Start Date and Event End Date search fields on the Create Batch Merge Document page that is accessed from All Tabs > Batch Merge.
- Go to Setup > Create > Objects > Property > Page Layouts > Edit Property Layout.
- In the Property Layout toolbar, click Fields.
- Drag the Default Batch Merge Start Days and the Default Batch Merge End Days fields onto the layout under the Default Booking Decision Days field (Booking & Event Configuration section).
- Click Save at the top of the Property Layout page.
- Repeat these steps for the Event Only Property Layout (if applicable).
After an event order has been distributed to the banquets team, it can be marked Distributed. To make this functionality available to R5 users, the Distributed checkbox needs to be added to the Booking Event and Booking Document layouts.
- Go to Setup > Create > Objects > Booking Document > Page Layouts > Edit Booking Document Layout.
- In the Booking Document Layout toolbar, click Fields.
- Drag the Distributed field onto the layout under the Last Sent Date field.
- Click Save at the top of the Booking Document Layout page.
- If a warning is displayed, click Yes to confirm you want to save your changes.
- Repeat these steps for the Booking Event layout. Place the Distributed field under the Booked Date.
To take advantage of the new features in R5, you need to add the Done checkbox to the Booking Events related list. This will help users quickly identify which events have completed event orders that are ready for distribution.
You need to add the Distributed checkbox to the Booking Documents related list so users can see which event orders have already been distributed to the customer and banquets.
- Go to Setup > Create > Objects > Booking > Page Layouts > Edit Booking Layout.
- Scroll down the page to the Booking Events related list, and then click the Properties
 icon.
icon.
The Related List Properties - Booking Events window opens.
- In the Available Fields list, select Done and then Click Add to move the field to the Selected Fields list.
- Using the Up and Down buttons, position the Done field where you want it displayed in the related list.
- In the Sort By list, select Last Modified Date, and then select Descending.
- Under Apply Column Information to Other Page Layouts, check Select All.
- Click OK.
- Click Save at the top of the Booking Layout page.
- Follow these steps to add the Distributed checkbox to the Booking Documents related list.
- Repeat this entire procedure for the Event Only Booking layout (if applicable).
Insert the Root Object merge fields
The Root Object merge fields tell the system where each BEO in the batch merge begins and ends.
- Open the BEO template in Microsoft Word.
- Locate the first table in the document and insert your cursor in the upper-left table cell directly before the word "Booking."
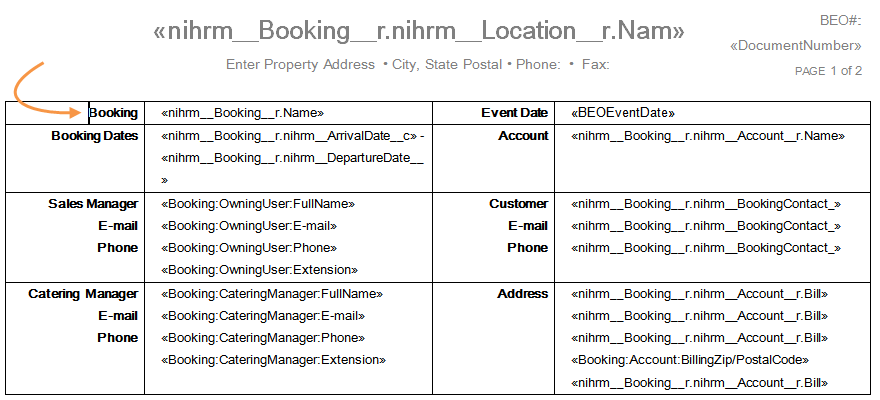
- Press Enter to insert a space between the header and the table.
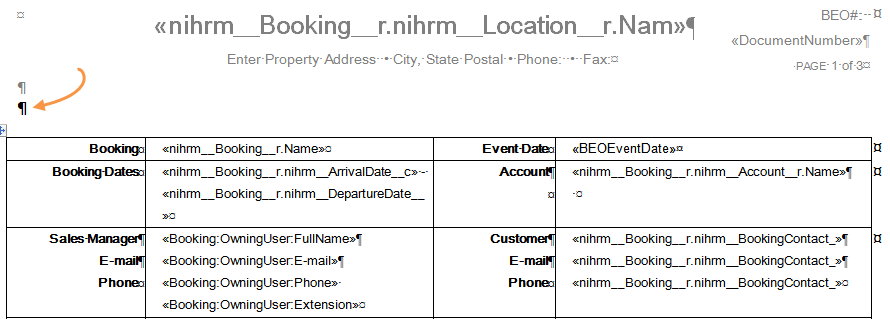
- Set the paragraph line spacing to 1.0
- Change the spacing after the paragraph from 10 to 0.
- Press CTRL+F9 and enter Mergefield TableStart:RootObject in the new merge field.
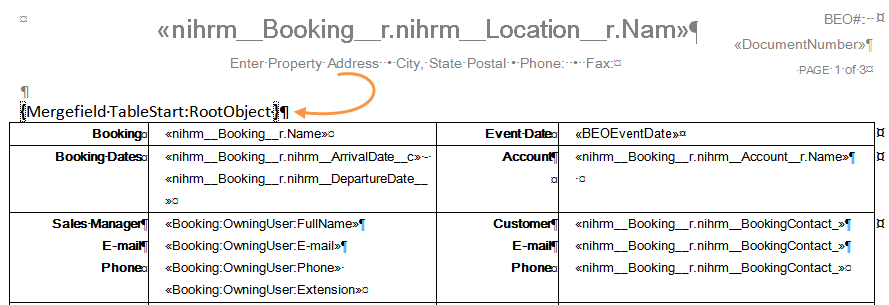
- Insert your cursor under the last table in the document.
- Press CTRL+F9 and enter Mergefield TableEnd:RootObject in the new merge field.
There is no need to adjust the size of the font in the closing Root Object merge field.
- Save your document.
Replace the NumPages fields with SectionPages
When you replace the NumPages field with the SectionPages field, the system will restart the page numbering for each BEO included in the batch merge.
- Right-click the NumPages field in the upper-right corner of the header and click Edit Field.
If you don't see the field, press ALT+F9 to display the field codes.

The Field dialog box opens.
- In the Field Names list, select SectionPages and click OK.
- Repeat steps 1 and 2 for any additional NumPages fields in the document.
- Press ALT+F9 again to hide all field codes.
- Save your document.
Update the page formatting for the document
- On the Insert tab, click Page Number, and then click Format Page Numbers.
The Page Number Format dialog box opens.
- Under Page Numbering, select Start At and leave the default value of 1.
- Click OK.
Delete the hidden bookmark
- On the Insert tab, click Bookmark.
The Bookmark dialog box opens.
- Select the Hidden Bookmarks checkbox.
The _GoBack hidden bookmark is displayed.
- Select the _GoBack bookmark and click Delete.
- Click Close.
Hide event information in BEO sections when there are no menus or items
If an event does not have any menus or items assigned to a particular BEO section, you can hide the event information so it isn't unnecessarily displayed in that section. To do this, you need to do the following:
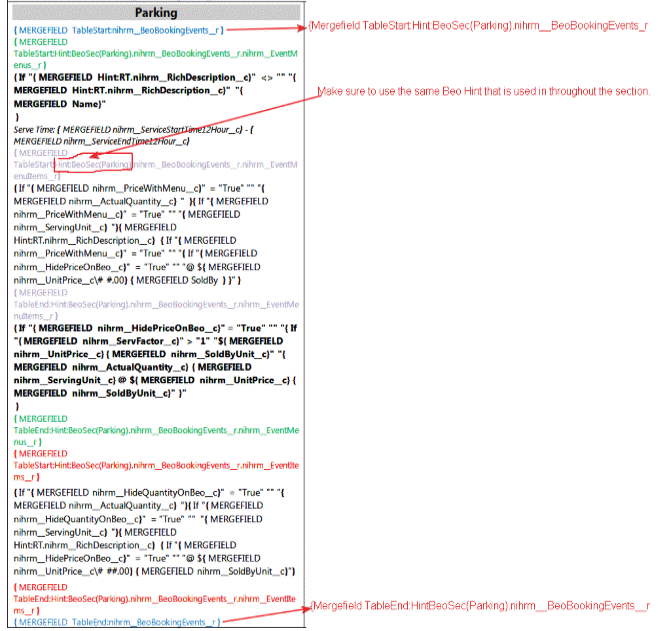
- Add "Hint:BeoSec(SectionName)" to the nihrm
 BeoBookingEvents
 r field in each section.
 - Update both the TableStart and TableEnd merge fields in each section.
- Change the SectionName in the hint for each section (for example, Food, Beverage, Parking, etc.).
The following image illustrates how you would update a section named Parking.
- Open the banquet check template in Microsoft Word.
- Hover your cursor over the Sections table to display the four way arrow icon in the upper-left corner of the table.
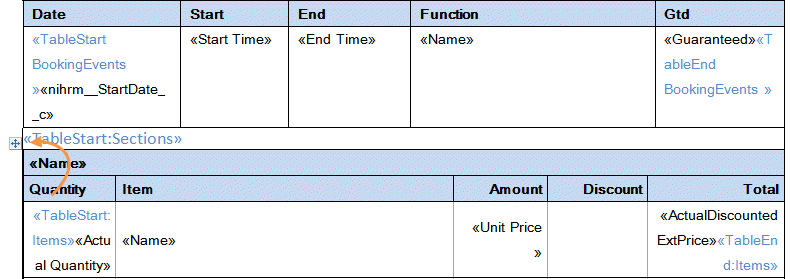
- Right-click the arrow icon and click Table Properties.
The Table Properties dialog box opens.
- In the Table folder, under Text Wrapping, click the None icon, and then click OK.
- Next to the Sections table, right-click the arrow icon again, and then click Cut.
- Insert your cursor immediately to the right of the <<TableStart:Sections>> merge field.

- Right-click to open the shortcut menu and click Paste as Nested Table.
After pasting, your cursor needs to be located just about the <<TableEnd:Sections>> merge field.

- Press the Delete key to remove the space above the <<TableEnd:Sections>> field.
- Hover your cursor over the Booking Events table to display the four way arrow icon in the upper-left corner of the table.

- Right-click the arrow and click Cut.
Your cursor is displayed in the narrow cell just above <<TableStart:Sections>>.
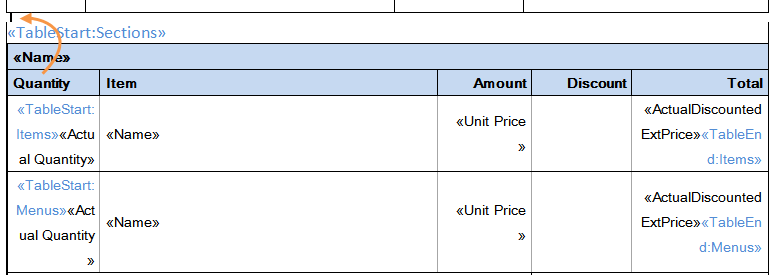
- Right-click to open the shortcut menu and click Paste as Nested Table.
- Again, right-click the arrow icon next to the Booking Events table, and then click Table Properties.
The Table Properties dialog box opens.
- In the Table folder, under Alignment, click the Left icon, and then click OK.
If you want users to be notified when their batch merge has processed, you can activate the Merge Complete workflow that is included with R5. This will send users an email alert using the Batch Merge Complete email template that is also included with R5.
For information on using workflows and email templates, please refer to Salesforce Help.