Existing MeetingBroker, new integration
If your property has been using MeetingBroker for a while and then you purchase a new integration to Amadeus Sales & Events Management - Standard & Essentials (ASEM), we will run a utility to "push" your existing MeetingBroker RFPs into the system. Those RFPs will automatically create inquiries in ASEM. This allows you to link up the inquiries with your existing bookings to establish communication with MeetingBroker. If you haven't yet entered a booking, you can save a lot of time by using the inquiry that is created during the push to create one. That's the beauty of having the integration—a lot less typing for you when you get a new lead! Then as you make changes to your inquiries and bookings, the relevant information is automatically sent back to update MeetingBroker—and sometimes even the person who originally sent the lead.
Your Amadeus project manager will schedule the date for the integration and RFP push with you.
Before the push date, a property administrator must complete all of the steps in the Setup MeetingBroker Integration topic, and pay close attention to other areas called out below. Your team needs to clean up the existing leads in MeetingBroker to make life easier after the push. Steps for each type of MeetingBroker property are provided below.
Unless otherwise specified with your project manager, the RFP push typically sends RFPs meeting the following parameters:
-
Start Date: one month prior to the push date
-
End Date: the year 2065
-
RFP Business Status: Inquiry, Prospect, Tentative, and Definite
-
You can also provide specific RFP IDs outside of this range to your project manager to be included in the push if necessary
After the push, you'll have some inquiries that ASEM thinks are brand new. Your team will spend a little time processing those by following the steps provided below. When that's complete, you're ready to enjoy the benefits of your new integration.
Before the RFP push
- In ASEM, ensure your current taxes will be applied to events created by the integration. In the left side panel, click Setup, click Property Details, expand the General Information section, and make sure the Default Tax Set field is completed. See Taxes to learn more.
- After the push, if there are any inquiries that the team forgot to turn down in MeetingBroker, they'll need to change the status of the inquiry in ASEM to Turned Down. Usually you have already communicated that turndown to the customer some other way. To prevent this from sending a duplicate email message to the customer, we recommend disabling the setting for this in MeetingBroker. When cleanup is complete, you can turn this back on if you want to use it. In MeetingBroker, click the Administration link, then open your property in the Locations tab. In the General tab, clear the Send Turn Down Email When Turning Down RFP from Integrated S&C Systems check box. Make sure you click Save at the top of the window.
These tasks are covered in the Setup MeetingBroker Integration topic that you should have already completed, but are extremely important, so we're calling them out again:
- Assign the current Default Lead Coordinator (DLC) in both the Property page in ASEM and the Location Details page in MeetingBroker. Confirm that the user is active and their email address in ASEM matches in MeetingBroker.
- Assign your default room types in the MeetingBroker section of your ASEM Property page.
- Enter all of your ASEM setup values in MeetingBroker, and map them with all of your subscribed channels.
Making sure RFPs that didn’t materialize are turned down in MeetingBroker before the push makes the integration process much easier and prevents sending messy data into the system.
To easily see the list of RFPs that will be included in the push, in MeetingBroker, click the Reports tab and select the RFP-Business Data Tracking report. Select the following criteria:
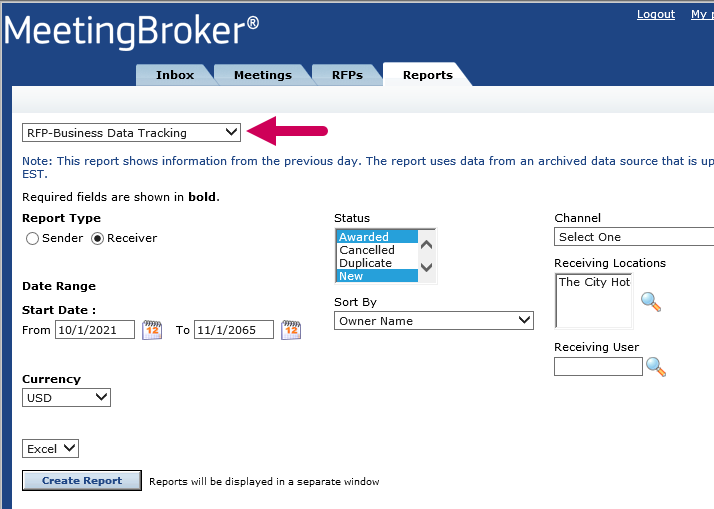
Report Type: Receiver
Status: Press and hold CTRL on your keyboard, and select Awarded, New, and Updated
Receiving Locations: Click the Find button, in the search window that opens select your property, then click Update at the top of the window
Start Date: Enter the dates for the RFP push (typically one month prior to the push date through 2065)
Sort By: Owner Name
Currency: Select yours
Then select Excel in the last field, and click Create Report.
If you have a large team and too many RFPs in this date range to manage with one list, use the Receiving User field and run the report for one person at a time, sorting by RFP Start Date.
Send the report to your team and have them compare the information for the RFPs they own in the report with their bookings in your sales and catering system. Someone with Director access should review the RFPs that are owned by previous employees. Go ahead and reassign the active ones to the current person who will own the booking so they are easy to find in ASEM.
If there are RFPs that did not materialize into a booking that still appear active in MeetingBroker, open the RFP, click the Turn Down button, and if communication regarding the turndown was already sent, make sure the customer's email address is deleted from the To: field. Select the Lost Business Reason and then click Send to update the status in MeetingBroker.
Open the My RFPs page in SUE (https://my.meetingbroker.com/SimpleUi/MyRfps.aspx). In the Viewing dropdown, select My Outstanding Active RFPs.
- In the Next Step column, filter and only view Respond and Confirm.
- If there are RFPs that did not materialize into a booking that still appear active in MeetingBroker, open the RFP, and either click the Turn Down or the Did Not Win button. If communication regarding the turndown was already sent, make sure the customer's email address is deleted from the To: field.
When everyone has finished cleaning up their own RFPs, someone with Director access to the location should follow the above steps using the All Outstanding Active RFPs view in case there are stale RFPs in the list that were owned by a previous employee.
After the RFP push
Perform these steps as soon as possible following completion of the integration.
When a new inquiry is created in ASEM, the status defaults to Open. This will be the status for all of the new inquiries created by the push. Now your team needs to bring the inquiry to the current status by either linking it to an existing booking, creating a booking from the inquiry, or changing the inquiry status if no booking is required.
Now that your integration is active, all changes should be made in ASEM, not in MeetingBroker.
Have your team click Inquiries in the left navigation bar. If one person is doing the cleanup, click the All RFP Inquiries tab. If you have a large team, they may find it easier to work from the My Open Inquiries tab to just see the ones they own. They can quickly identify the ones from MeetingBroker using the RFP ID column.
When viewing the Inquiries list, the Status column indicates the inquiry status in ASEM. Your goal is for none of them to be Open.
These are the typical definitions of each inquiry status. Your organization may have different definitions. Please check with your administrator if you are unsure.
| Open | The inquiry was created, but it has not yet been processed to respond to the customer. |
| Working | The appropriate owner has been assigned, and they are working with the customer, but it's not ready to be turned into a booking yet. |
| Qualified | A booking has been created. This status is automatically assigned when you click + Booking in the inquiry and save the booking. From this point forward, you will do all of your work in the booking instead of the inquiry. |
| Turndown | You were unable to or chose not to bid on the business (sold out, event space not large enough, their budget was not enough to afford your property, etc.). |
| Lost | The customer chose not to select your property. |
Click the inquiry name to open it. If the RFP contained attachments, you'll find these in the RFP History tab. The RFP Information tab provides key MeetingBroker details like the RFP ID, details about the sender, and the RFP Status.If the RFP Status is Self Awarded, that means the booking is definite. Something tricky about the RFP Status is that it remains at "New" until you reach the final status, like definite or turned down. Refer to your sales & catering system to determine which status they're at today.
Now you have to determine what to do with the inquiry.
If you have a matching booking in ASEM - you need to link the inquiry and booking together. In the top section of the Inquiry page, click in the Booking Name field. All bookings that are not linked to an inquiry will display. Start typing the name of the booking to filter the list. Select the appropriate booking and Save to make the connection. If the booking you need won't display in the list, click Bookings in the left menu, open the booking, and then click the Additional Details tab. If another inquiry is in the Primary Inquiry field, make note of the name, and then click the X to remove it. Only one inquiry can be linked to a booking, and it must be the MeetingBroker inquiry. Now you can search for and select the inquiry here to link them. Don't forget to click Save. Go back to the Inquiries area, find the duplicate inquiry that's not from MeetingBroker, and turn it down. If you have any other manually entered inquiries that are duplicates of pushed MeetingBroker RFPs but do not have a booking linked to them, turn those down as well.
If you don't have a booking - click the + Booking button at the top of the page and follow the instructions in the Training & Help side panel to find or create the account, contact, etc. The original RFP information that's in MeetingBroker is used to create the booking. That is what the customer asked for when they first sent the lead, not what you sent in a proposal or entered into the Business Data part of MeetingBroker. So when the booking opens, you'll need to update everything to the current state.
-
Make sure the guestrooms are assigned to the appropriate types and assign rates.
-
Detail the events with the correct function room, rental, etc.
-
Update the booking status to Prospect, Tentative or Definite.
If the lead was previously turned down - change the inquiry status to Turned Down, select a lost business reason, and save. If the lead is from Cvent or an above-property sales channel (like Connex/Central Sales), the Lost Comments are sent back to them. If this lead was already turned down and you don't want to confuse them, you can enter a note in the Lost Comments field letting them know that you're cleaning up data, to disregard this update.
When none of the Inquiries have a status of Open, you’re done! Moving forward, just watch for your New RFP email notifications. When you get that email, don’t click anything – no need to open MeetingBroker anymore. That’s your cue to open the Inquiries area in ASEM, click My Open Inquiries, and work the lead all in one system.