Create assignment rules
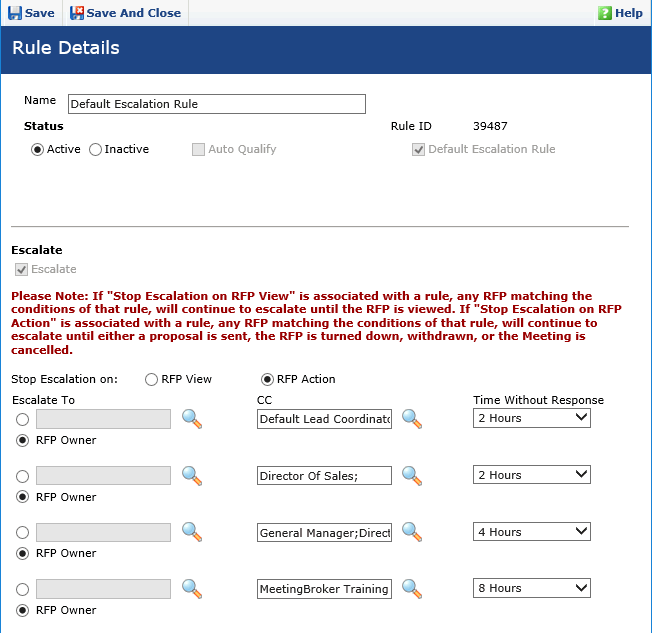
Use the Assignment Rule Details page to create a new assignment rule, modify an existing rule, copy other users, set the escalation policy for a single rule, or create a default escalation rule.
Subscription rules and assignment rules are created on different Assignment Rule Details pages. Follow the appropriate directions below.
To work with Subscription rules
From the Administration Home page, click the Rules tab and then click Add to create a new rule, or click on an existing rule to modify it.
To work with Location rules
From the Administration Home page, click the Locations tab, select a location, click the Settings tab, and then click Add or click on an existing rule to modify it.
Before creating assignment rules, please refer to the following topics for additional information: Overview: Assignment rules and Overview: Escalation.
To create an assignment rule
- Complete the top section of the page.
- Enter the conditions for the rule.To enter multiple values in the text fields, separate the values with a semicolonwithout spaces(CA;NV;NM;UT). The conditions must match exactly what the sender types into the RFP, so provide the various ways they might enter information (CA;California;NV;Nevada).
|
Field |
Description |
|---|---|
| Total RFP Value | Total Guestroom Revenue + Total Event Revenue |
| Total Event Revenue | If the total event revenue on the RFP is blank, but the total meeting budget and the total guestroom revenue are provided: Total Event Revenue = Total RFP Value - Total Guestroom Revenue |
| Total Guestroom Revenue | Total number of rooms * Number of nights * Budgeted rate |
| Peak Guestroom Count | The maximum number of guestrooms on one day |
| Lead Time |
The number of days from the day the RFP was received to the day of arrival. For example, if one person works with leads that are more than three months out, enter 90. |
| Sender Location | The name of the location in your subscription that sent the RFP. This could be a sister property or a specific sales office if your organization has above-property teams (national, regional, global sales offices). For example, if the lead comes from the New York or Chicago National Sales team, route the leads to Barbara Jackson. |
| Sender | The name of the person at a location or sales office in your subscription who sent the RFP. For example, if the lead comes from Mary Diaz at the New York National Sales office, route the leads to Jenny Lee. |
| Channel Name |
The name of the channel that sent the RFP (such as Cvent). The channel name must be entered exactly as displayed on the Channels page (including spacing, capitalization, etc.). For example, SignUp4, or Groups360. |
| Company/Agency Name, City, State, Country |
Use these fields to route RFPs by company or agency name or address. If you use the Name field, we recommend that you also create master accounts. If your organization uses single account management (for example, you have one big account for LRB Communications where you add contacts from any location) , you should use contact address fields for routing. |
| Company Contact/Agency Contact City, State, Country | Use these fields to route RFPs by contact or agent address. |
| Receiving Location Brand | Used only in subscription rules to filter by locations associated with a certain brand (as indicated in the Brand field on the Location General page). |
| Market Segment, SIC Code | To select multiple values, press CTRL while clicking each applicable value. |
| Is Managed Account, Is Managed Agency |
Selecting this check box applies the escalation rule to RFPs that are received from master accounts or agencies that have been identified as Managed. |
|
Receiving Location Country |
Used only in subscription rules to filter by a location's country (as indicated on the Location General page). |
|
Number of Attendees |
The number of people attending events |
- Assign the RFP Owner and copy other users, if applicable.
When copying users on assignment rule notifications, selecting a role rather than a user's name can save time when you experience turnover at your location. For example, if you have several assignment rules that copy the Director of Sales and the current Director leaves, you can assign the Director of Sales role on the Location Details page to the new user in one step, rather than replacing the Director's name in every assignment rule.
|
Field |
Description |
|---|---|
| Assign When |
|
| Assign To |
For location assignment rules, you must select the RFP Owner. For subscription assignment rules, you can only copy (CC) users on the RFP (see below). |
| CC |
Select up to four users or user groups to copy on the RFP. The copied users are added to the RFP Team and have full rights to modify it. In the grid, select the types of email notifications that should be sent to the copied user. |
- Apply escalation to this rule. (optional)
|
Field |
Description |
|---|---|
| Escalate | When this check box is selected, the RFP is escalated as long as another escalation policy does not overrule it. Escalation is considered in the following order: subscription assignment rules, the default subscription escalation rule, location assignment rules, and, finally, the default location escalation rule. |
| Stop Escalation On |
Select what a user must do to stop the escalation email messages from being sent. RFP View - If you just want to make sure someone has reviewed the New RFP notification, select RFP View. The RFP will continue to escalate until one of the following occurs:
|
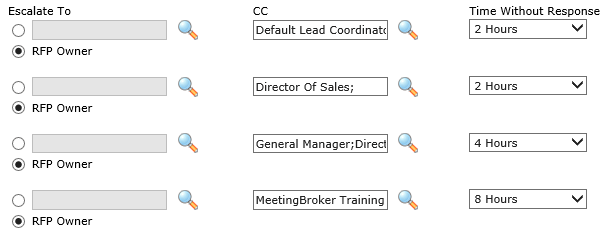
| Escalate To |
We recommend that you always escalate to the RFP Owner because they are, ultimately, responsible for the business. If you select someone else in this field, they become the RFP Owner and the previous owner stops getting notifications about the lead. This might cause confusion and multiple responses to the customer. |
| CC |
You can copy additional users and/or user groups on the RFP. The copied users will receive the CC Escalated RFP email message and have full rights to access and modify the RFP. We recommend copying the DLC on the first and all subsequent escalations. Beginning with the second escalation, add additional people to ensure that someone can respond to the lead. On the later escalations, always keep copying the people who were copied before so they have a complete picture of where the escalation is when they return to their desk. For example:
|
| Time Without Response |
Select the amount of time that can pass before the escalation email messages are sent. The options range from 15 minutes to three days. Each escalation level builds on the previous one. For example, a new RFP arrives at 9:00 AM. If the first escalation is set for one hour, the first email will be sent at 10:00 AM. If the second escalation is set for two hours, the second email will be sent two hours after the first escalation at 12:00 PM. Escalation only counts down during business hours when you are available to respond, as defined on the Location Details page. For example, your hours of operation are Monday - Friday 8:00 AM to 5:00 PM, and this is your escalation policy:
If a new RFP arrives Thursday at 2:00 PM, escalation will take place as follows: Escalation 1: 4:00 PM Thursday Escalation 2: 9:00 AM Friday Escalation 3: 1:00 PM Friday Escalation 4: 12:00 PM the following Monday If you select a day option in Time Without Response, that means a full business day must pass before the next escalation. For example, if you select 2 Business Days, your office hours are Monday - Friday 8:00 AM to 5:00 PM, and a new RFP arrives on Friday at 11:00 AM, the escalation will occur as soon as the office opens on Wednesday (8:00 AM). Because the RFP arrived while Friday was already in progress, MeetingBroker will wait for the next two full business days to pass (Monday and Tuesday), and then escalate accordingly. |
- Click Save or Save and Close.

