Enable and merge additional room block fields
If your property creates multiple guestroom blocks in bookings and you are on R44 or higher, you have the option to use six room block fields that make it easier to keep track of information that can vary for sub-blocks. For example, if you create one booking for a tournament and then create separate room blocks for each sports team, you can track things like the housing method and billing instructions inside the room block instead of using the booking fields.
The six fields display in the Advanced tab of the Modify Room Block window.
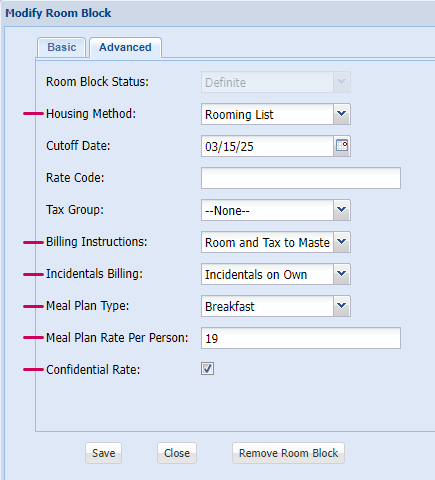
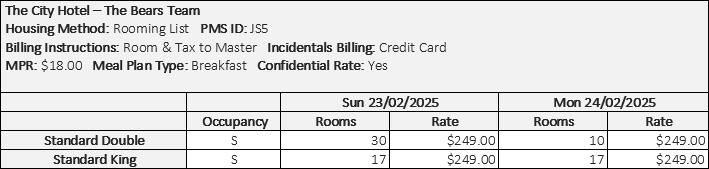
The completed fields can be displayed in the header of each room block's table in your merge documents for crystal clear communication with your customers and colleagues.
If this sounds like something you want to use, an administrator needs to complete the tasks described below.
Properties that have an integration to a Property Management System (PMS) must note that there is no change to integration configuration at this time, therefore these new fields do not pass through the interface.
Edit picklist values
The Billing Instructions, Incidentals Billing, and Meal Plan Type fields come with default picklist values. If desired, a corporate administrator can customize the values to match your company's business practices.
- Go to Setup > Create > Objects > Room Block.
- Click the Custom Fields & Relationships related list, and then click the field you want to edit (Billing Instructions, Incidentals Billing, or Meal Plan Type).
- Navigate to the Values section and make your changes:
- To add a new value, click New. In the text box, type the name of the new value you want to add using the exact spelling and casing. To add multiple values, press ENTER to place each value in it's own line. Click Save.
- To remove a value from the picklist, click Deactivate next to the name, and click OK in the pop-up window.
To rearrange the picklist into alphabetical order, click Reorder, select “Display values alphabetically, not in the order entered”, and then click Save.
It can take around 15 minutes for picklists to update, so you may not see the changes right away. If you don't see the changes you made after 24 hours, contact Amadeus support to investigate further.
The Housing Method uses the same values as the Housing Method field that displays on your Booking page. To learn how to edit that list, see Setup values.
Merge documents
The remaining tasks are all about merge document configuration. The steps you need to take depend on the Template Type you use—Booking or Advanced Booking. If you have properties that use both types, complete all of the steps. To check, go to All Tabs (+) > Document Templates, select All in the dropdown and click Go. Sort by Template Type. You should see Advanced Booking immediately. If you have a really long list, click the letter B at the top of the list to only display template types that start with B. Then click the Template Type header again to reverse the sort and you can see if you have any Booking template types. If you just see BEO, then you don't have any.
Edit Property page layout
If any of your properties use the Booking Template type for merge documents, you must add a field to the Property page layout.
- Go to Setup > Create > Objects > Property.
- Go to Page Layouts and click Edit next to Property Layout.
- In the palette, click Fields.
- Click and drag Merge Additional Room Block Fields to the Document Merge section of the page layout under the Cancellation field.
- Click Save at the top of the Property Layout page.
Properties that select this check box and complete the room block fields will automatically see them displayed in their guestroom tables the next time they merge a Booking Template (not Advanced Booking templates - they require additional steps described below). This is basically all you have to do if you only use Booking Template types.
Good to know:
To keep your documents easy to read and free from unnecessary clutter, we'll only display fields that were completed on the room block.
-
The Housing Method, Billing Instructions, Incidentals Billing, and Meal Plan Type will display if the picklist values are selected on the room block.
-
Meal Plan Rate will display if the rate entered is greater than 0.
-
Confidential Rate will display when the check box is selected.
If you have custom template parts
A new merge table for advanced booking documents is added as part of your update to R44. If you have customized template parts, a Corporate Administrator needs to add the custom tables to the new template part zip file immediately following your update.

Update Advanced Booking Templates
To update the tables in Advanced Booking templates, you must first download the latest version of the Amadeus Merge Tool. Download the latest version here.
Display Room Block fields on Merge documents
The steps you need to take depend on the Template Type you use—Booking or Advanced Booking.
-
From your properties page, navigate to the Document Merge section.
-
Select Merge Additional Guestroom Fields, and then click Save.
-
Test your document by merging it from a booking to confirm the changes.
Good to know:
To keep your documents easy to read and free from unnecessary clutter, we'll only display fields that are being used on the room block.
-
The Housing Method, Billing Instructions, Incidentals Billing, and Meal Plan Type will display if the picklist values are selected on the room block.
-
Meal Plan Rate will display if the rate entered is greater than 0.
-
Confidential Rate will display when the check box is selected.
-
From the Document Template page, scroll to the Notes & Attachments section and click View by the first attachment in the list.
-
Log in to the merge tool, making sure you're on the latest version (see above).
-
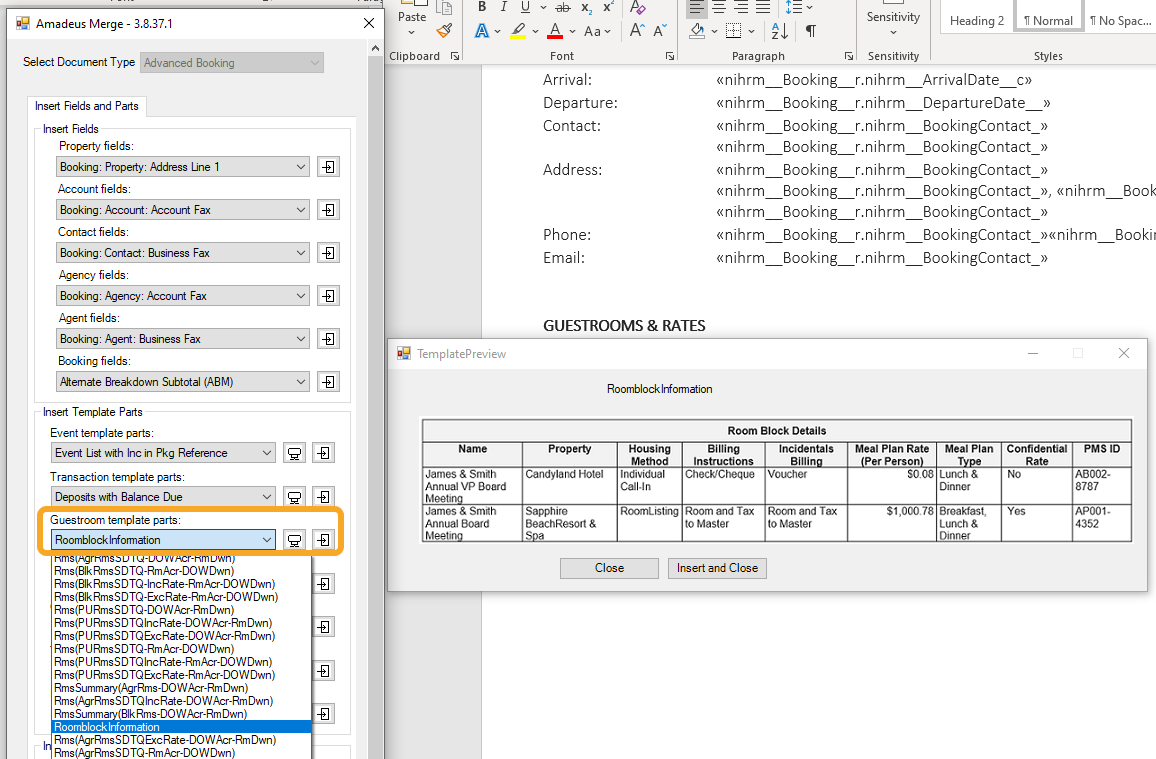
In the Select Document Type list, select Advanced Booking.
-
In the Guestroom template parts list, select Roomblock Information.

-
In your Word document, place your cursor where you want to insert the new table, then click the Insert Template Part button.
-
Save your word document locally to your computer.
-
On the Document Template page, click Attach File and follow the steps displayed on the page to upload the updated version of your word document.
-
Review the changes by testing the document.
Good to know:
You can modify the table and remove columns that you don't need by merging cells in the same row. Word keeps any text in the cell on the left, so go from right to left. Just remember the table must have a «TableStart: » merge field in the first column and a «TableEnd: » merge field in the last column.
In the merge tool under Insert Template Part Fields, you'll see a picklist for Guestroom fields. These can be inserted into the header of your existing guestroom tables. The important step is to move the tilde from the name of the room block to after the last merge field. If you only want the fields to display when they are in use on a booking, you'll need to add an extra formula around the fields.
Because the majority of our customers don't create multiple guestroom blocks, we hide the name of the room block in the guestroom tables of Advanced Booking documents. It is there, but in disguise with a tiny font size and light color so it's easy for you to show it if you want to.
To display the room block name:
- Click inside the top left cell of the table. Zoom in to 300% and highlight the hidden line above the text “Builder: Standard;”.
- Change the text color to black and increase the font size to 8 pt. If you plan to add more fields, change the alignment to left justified so there is a little more space.

If you want to display more information that is specific to each room block, such as property name, housing method, or PMS ID—you can add fields to the header section.
-
Ensure that you have already displayed the room block name (see above for the steps).
-
In the header of the guestroom table, place your cursor where you want to insert a merge field (either just before or after «Name » ~).
-
Do one of the following:
-
In the Merge Tool, select the field you want to add from the Guestroom fields picklist under Insert Template Part Fields, and then click the Insert Field button. To make it easier to read the information after the document has been merged, type a text label in front of each field, and format the font to italics, bold, or underlined.
-
If you want to get fancy and keep your document free of clutter, place the fields within a formula so they will only display when they are not blank.
-
Place your cursor where you want to add the new field.
-
Press CTRL + F9 on your keyboard to insert a new blank merge field.
-
Copy and paste the following inside the merge field brackets: IF «MERGEFIELD»=“ ” “ ” “TypeYourTextLabelHere: «MERGEFIELD»”.
Highlight each «MERGEFIELD» and replace them with the field you want from the merge tool. Update your text label.
It should then look like this: {IF «PMSID»=“ ” “ ” “ PMS ID:«PMS ID»”}
 Want to know more about the formula?
There are three sets of quotations that make an if-then-else statement. Here, we're saying if the PMS ID is blank (first “ ”) then don’t display anything (second “ ”), otherwise display the text label and value within the merge field (final “ ”).
-
Right Click on the merge field, and select Update Field.

-
-
-
If you added any merge fields after the name of the room block, you'll need to make sure the tilde “ ~ ” appears as the final character after any merge fields you added:
-
Right click on «Name » ~ and select Toggle Field Codes.
-
Move the tilde “ ~ ” to before the text “Builder: Standard;”. You can cut and paste, or delete and then re-type the tilde if you find that easier.
-
Right click on {MERGEFIELD Name } and select Update Field.

-