Create merge templates
The content of this page is specific to the Delphi product type. If you are using the Delphi Core product type, click here to access the Delphi Core-specific online help.
After users have detailed a booking, they can create a contract, BEO, banquet check, or booking check using the merge feature. The information they have entered in the booking is merged into a selected document template and emailed to their customers. To enable this feature, administrators need to create templates using Microsoft Word and link them to a Document Template in Delphi.
Additional information
Before you create your merge templates, consider the following:
- If this is your first time, you need to Download and install the Merge Tool.
- You need either a security token or your MFA device to log in to the Merge Tool in Microsoft Word.
- If you intend to generate a document in a different language, such as French or Spanish, refer to Create merge templates in alternate language for help.
- Create each document template in Delphi.
- If your org has custom fields, corporate administrators need to add them to the Merge Tool to make them available for merging.
To create a merge template
Step 1: Create a merge template in Word
- Open Microsoft Word.
- Open the document you want to use as your template.
- Log in to the Amadeus Merge Tool.
- In the Merge Tool, select the Document Type for the template. The document type you select determines the following:
- The location where the template can be merged from. For example, if you select Advanced Booking you can merge your document from the Booking page. If you select Account, you can merge your document from the Account page. The table below displays the different document types and where they can be merged from.
Document Type Page Account Account Contact Contact Inquiry Inquiry Booking (Contract, Resume) Booking Advanced Booking Booking BEO Booking Banquet Check Booking Volume Contract Volume Contract Amadeus recommends that you use the Advanced Booking document type for all your booking templates. This document type has all the tables you need to merge any booking information. Some tables are not available in the Booking (Contract, Resume) document type.
- The types of information that can be merged into the template. Each document type displays merge fields specific to the selected template. The advanced booking document type also includes several formatted tables, called template parts, that can be added to your merge documents. If you do not need some table columns, you can remove them using Word's table function. You can also insert additional fields, called template part fields, into a table to customize the information that displays.
If you selected the advanced booking document type, you need to add the TableStart and TableEnd merge fields to the beginning and end of your document. These fields are required when you work with this document type. Both fields can be inserted using the merge tool, version 3.8.10.1 or higher. The fields are located under the Property section, at the end of the list.
To manually add the TableStart field, insert your cursor below the document header and press CTRL+F9. Copy and paste the following between the curly brackets:
MERGEFIELD TableStart:RootObject
To manually add the TableEnd field, insert your cursor above the document footer and press CTRL+F9. Copy and paste the following between the curly brackets:
MERGEFIELD TableEnd:RootObject
- The location where the template can be merged from. For example, if you select Advanced Booking you can merge your document from the Booking page. If you select Account, you can merge your document from the Account page. The table below displays the different document types and where they can be merged from.
- In your Word document, place your cursor where you want to insert a merge field or table.
- To insert a field, in the Merge Tool, find the merge field you want and click Insert Field (
 ). The field inserts at the location where you placed your cursor.
- Merge fields that are already in your document can be copied and pasted into other parts of the document.
- If you cannot find a merge field you want to use, such as a custom field, it needs to be added to the Merge Tool by a corporate administrator
-
To insert a table, within the Insert Template Parts section of the Merge Tool, find the table you need and click Insert Template Part (
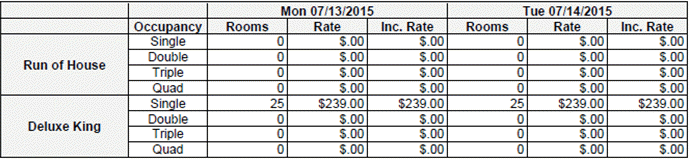
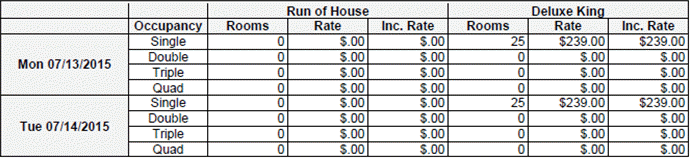
). To display packages on your merge template, see Tips for displaying packages on merge documents.A template part is a formatted table that groups related merge fields together. Some table examples include: packages, guestrooms, menus and items, and deposits. For each template part, options are available to choose what information you want to merge and how you want it to display. For example, here are two ways to display guestroom information:
Additional considerations for Other Income tables
If you added an other income table to your document, the default Restaurant other income category needs to be replaced with the category you want to display.
Your property can group all other income items into a single category called Other Income, or you can have separate categories for those items, such as Golf, Spa, or Transportation. If you use multiple categories, you need to insert an Other Income table for each category in your merge template. The tables in the Merge Tool use Restaurant as the default other income category. After you add one of these tables to your template, you need to update Restaurant with the category you want to display.
To update the Other Income category on a table
- Right-click <<TableStart:BookingOtherIncome.Restaurant>> and click Toggle Field Codes.
- Replace the current Other Income category, Restaurant, with the name of the category you want to display. For example, { Mergefield TableStart:BookingOtherIncome.Restaurant } might become { Mergefield TableStart:BookingOtherIncome.Golf }.
If your other income category name has more than one word, you need to include the entire phrase in quotation marks after the word Mergefield. An example of this is { Mergefield “TableStart:BookingOtherIncome.Outside Vendor” }.
- Right-click the merge field again and click Update Field.
- Repeat these steps for the following three other merge fields:
- { Mergefield TableStart:BookingOtherIncomeDayDetails.Restaurant }
- { Mergefield TableEnd:BookingOtherIncomeDayDetails.Restaurant }
- { Mergefield TableEnd:BookingOtherIncome.Restaurant }
- For each additional Other Income category you want to include, repeat this procedure updating all four fields on each table.
Considerations for customizing tables
Some tables in the Merge Tool can be customized using additional fields, called template part fields.
For example, the default Transactions table shows deposits with balance due. If your property tracks each transaction using a unique reference number, you can modify the default table by adding a column and inserting the Reference Number field.
If you do not see the field codes in your template, press Alt+F9 to display them. You can also right-click a field and click Toggle Field Code.
To add columns within a table
- Using Word's table function, add a new column to the table. This is where you can insert the new merge field.
- In the first row of the new column, enter the column name. For example, if you add a reference number to the Transactions table, enter 'Reference Number.'
- Place your cursor in the second row of the new column.
- In the Merge Tool, find the field you want to add under Insert Template Part Fields.
- Click Insert Field (). The field inserts at the location where you placed your cursor.
Each table needs to have a «TableStart: » merge field in the first column and a «TableEnd: » merge field in the last column. If you insert a new field at the beginning or end of your table, cut and paste the appropriate merge field into the new column.
You can rename column headers and use Word's formatting tools to customize the text within the tables. You can also remove unnecessary columns using Word's table function. For further editing options specific to guestroom tables, see Customize guestroom tables in merge templates.
- Save the Word document.
Step 2: Create a document template in Delphi
After you create a merge template in Microsoft Word, make it available to users by attaching it to a document template in Delphi. Any time you make changes to your Word document, you need to attach the updated file to the document template record.
- Do one of the following to open the New Document Template page:
- To create a property document template, on the Property page, go to the Document Templates section and click New.
- To create a corporate document template, navigate to Document Templates and click New.
-
Complete the fields on this page as appropriate.
Document template details Name The template name needs to be unique and contain both the document type and the language, such as 'Group Contract' or 'Group Contract (French).' You cannot have two templates with the same name at a property.
Booking Event Select Select one of the following: None - Booking events are not applicable to the merge document.
Single - The user can select only one booking event for the merge document.
Multi - The user can select multiple booking events for the merge document.
Room Block Select Select one of the following: None - Guestrooms are not applicable to the merge document.
Single - The user can select only one room block for the merge document.
Multi - The user can select multiple room blocks for the merge document.
Booking Package Select Select one of the following: None - Packages are not applicable to the merge document.
Multi - The user can select multiple packages for the merge document.
Booking Other Income Select Select one of the following: None - Other income items are not applicable to the merge document.
Multi - The user can select multiple other income categories for the merge document.
Template Type The template type you select controls the type of information that displays. The template type needs to match the selection made when creating the merge template in Word. Master Source Corporate - The template is available to all properties. Property - The template is only available to the selected property.
Property If you create a property-specific template, find and select the property. For corporate document templates, leave this field blank. Active Select this checkbox to make the template available to users. Share with Delphi Select This option only displays in a multi-module org. Select this checkbox if this corporate template needs to be available to all properties using Delphi Select. The Master Source value needs to be Corporate and the Template Type value needs to be Advanced Booking.
Show BEO Menu/Item based on Serve Time Select this option to display menus and items by the order of the service times defined in the menu and item window. If the service times are the same for all menus and items, the assigned sort order controls the display order. The order priority is defined as follows: Service Start Date, Service Start Time, Service End Date, Service End Time, Sort Order. To use this feature, you need to use the default Amadeus BEO template. See Import Amadeus templates for more information.
Advanced booking display options details The following options are only available for the Advanced Booking template type.
Display Cross-Property Events Select this option to include cross-property booking events. This option requires the Merge Add-In Tool version 3.6.9.4 or higher, which includes the Property:Property template part field. Once this field has been added to an event table, the document displays the name of the property where each event is held.
Hide Run of House Rooms Hide Occupancies without Rooms/Rates
Hide Room Types without Rooms/Rates
Select these options to hide certain guestrooms from the merge document. These options can be helpful for properties that do not block ROH rooms or multiple occupancies. Additional information:
- When you select the Hide Run of House Rooms checkbox, the ROH row is hidden even if rooms are blocked in ROH.
- If values are entered for an occupancy on one room type, that occupancy displays for all other room types.
- Click Save.
- If you are creating a booking check that includes a Booking Check Revenue table, be sure to specify the sections within this table.
- On the Document Template page, go to Document Sections and click New.
- Enter the Name of the section.
- If your merge template includes package information, select the Packages Section checkbox.
- If you want non-package guestrooms to be included in the document, select the Guestroom Block Section checkbox.
- Click Save.
- In the Revenue Classifications section, click New.
- Find and select the revenue classification you want to associate with the section you just created.
Amadeus suggests creating at least two sections for booking checks. The first section needs to be labeled Guestrooms, with the Guestrooms Block Section checkbox selected, but without any revenue classifications included. The second section, named Events, needs the Package Section checkbox selected, and all revenue classifications need to be added to the Revenue Classifications section.
- Click Save.
- Attach the merge template to the document template you just created. To do this, on the Document Template page, go to Notes & Attachments.
Step 3: Test your document template
After you attach your Word merge template to a document template, you need to test it. Testing is an important part of the creation process and helps you to identify formatting changes that need to be made. Amadeus recommends you test your template often.
To test your document template
- Open the appropriate record type. For example, if you created a group contract, open a booking.
- Click Merge.
- Review the merged document in both Word and PDF.
- If necessary, make changes to the merge template.
- Save your template.
- Attach it to the existing document template record.
- Continue testing as needed.
Learn more...
Create merge templates for alternate languages
Add a property logo to merge templates
Add merge fields to Property page layout
Custom text for default merge templates
Customize guestroom tables in merge templates
Download and install the Merge Tool